Mail-Pieces Designing Your Way
EZ24x7 Help & Instant Hint Messages
Every screen has a question mark, "?", icon that gives you a quick hint of what to do next.
The [F1] key provides context sensitive tutorial help.
Use the "Help" menu from EZ24x7’s main window for more extensive help resources.
EZ24x7 "Mail-pieces" Tab
There are two mail-piece production modes, single tray or sack at a time or groups of trays or sacks.
Switch mail-piece production modes with a <right-click> on the navy-blue text to the right of the "Print" icon.
Single tray or sack mode displays "Next Tray" or "Next Sack". Group mode displays "<Click> To Set Group".
• Single tray or sack at a time allows you to enter the tray or sack number in the field below the text or <click> the text to load the next tray or sack. <Shift><click> loads the previous tray or sack.
• Groups of trays or sacks mode allow specification of start and stop tray/sack numbers and optionally insert tray or sack separators. Start and stop piece within the tray/sack simplifies recovery after a print failure.
EZ24x7 "Select Label" Drop-down List Box
There are 39 predefined envelopes and labels available on installation. Many of these have return address and/or Permit Imprint support. For this demo we are selecting the #10 envelope.
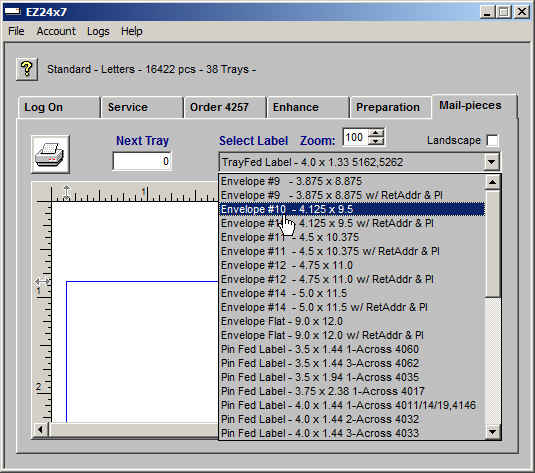
If you use a label with return address or Permit Imprint, there are simple configuration steps necessary to set these constants. See the last section of this page.
If you need to design a custom label or envelope, that is supported and discussed in the last section of this page.
EZ24x7 "Print Setup" Printer Icon
<Right-click> on the printer icon goes into ‘Print Setup’ where:
• ‘CutePDF Writer’ pseudo PDF printer was selected as the target printer
• From Setup->Advanced->Paper/Output to set Paper Size to “No. 10 Envelope” consistent with the "Select Label" choice above.
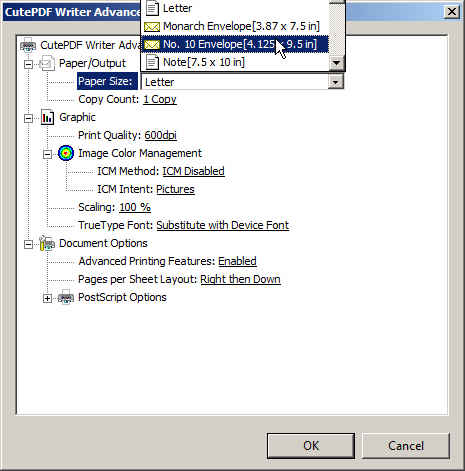
Pseudo PDF Printer – (Google "best free PDF writer"):
There are several free PDF writers that create PDF documents whenever you print. After installing a PDF Printer, it can be selected and configured from Print Setup.
EZ24x7 help frequently uses the “Bullzip PDF Printer” in examples where its “Custom Page Size” support allows greater freedom of paper size.
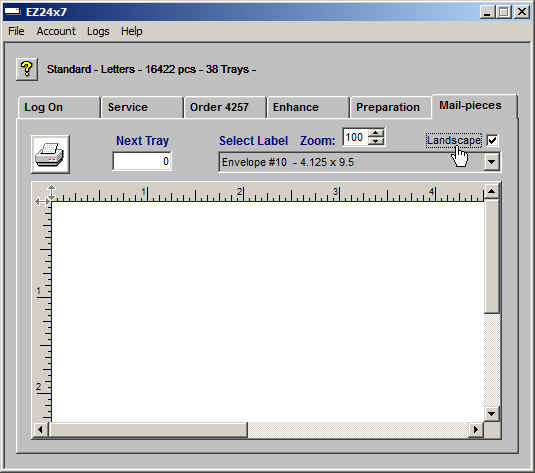
EZ24x7 "Adjust Landscape…" Checkbox
Sometimes a landscape adjustment may be necessary. ‘CutePDF Writer’ and the "#10 envelope" were chosen for this tutorial as an example requiring the ‘Landscape’ checkbox.
Single Tray or Sack Mode
If the print mode is single tray or sack at a time, the text reads "Next Tray" or "Next Sack". Alternately group mode displays "<Click> To Set Group". Switch mode with a <right-click> on the text.
Single tray or sack mode allows you to enter the tray or sack number in the field below the text or <click> the text to load the next tray or sack. <Shift><click> loads the previous tray or sack.
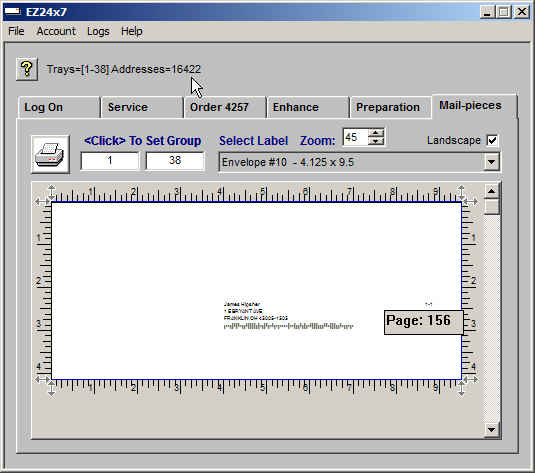
So that the entire envelope would be seen with respect to the ‘Print Setup’ and to demonstrate how many pieces were in this tray, ‘Zoom’ was set to 45 and the scroll bar was dragged to the bottom so that we could see the page number of the last address.
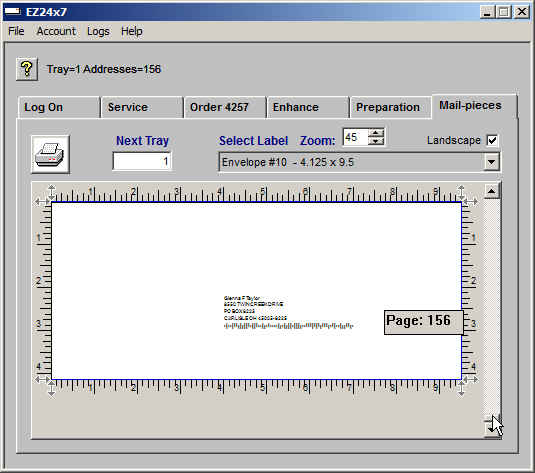
Referring back to preparation, you will see 156 mail pieces in tray 1 agreeing with the last piece marker showing ‘Page: 171’. A <click> of the "Printer" icon will spool tray 1 to the printer.
NOTE: <CTRL>+ and <CTRL>- zoom in and out in multiples of 10%. <CTRL>0 returns zoom to 100%. For finer control you can use the Zoom field.
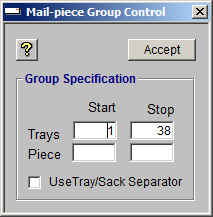
Group Tray or Sack Mode
The text will read "<Click> To Set Group" indicating group tray or sack mode. Alternately group mode displays "Next Tray" or "Next Sack". Switch mode with a <right-click> on the text.
Group mode allows you to specify start and stop tray or sack numbers and optionally insert label or envelope separators telling the person preparing the mail when to switch trays or sacks. You can control which mail-piece to start with after a print failure so that you can start printing after the last good mail-piece.
"<Click> To Set Group" opens the window below initialized with first and last tray or sack. You can change the start and stop sack as well as start and stop piece. As initialized, the entire mailing will be printed in preparation order.
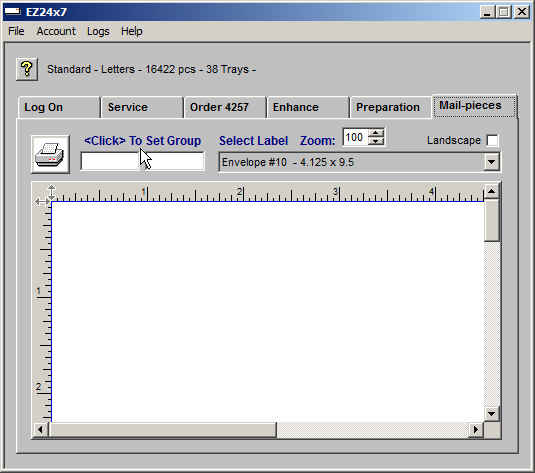
After clicking "Accept", the entire mailing was prepared as shown below. A <click> of the "Printer icon will spool the entire mailing to the printer.
Referring back to preparation, you will see 16,422 mail pieces in trays 1-38 agreeing with text at the top of the image above.
EZ24x7 "Print" Icon
To send mail-pieces reported on the top line to the printer, <click> on the printer icon.
How to Recover after a Printer Failure
Restart of any tray or sack requires 4 steps:
• Finding out what mail-piece number recovery should start with
• Switching to "Group" mode
• Specify the tray number and starting mail-piece
• <Clicking> the "Print" icon to send the missing mail-pieces to the printer
1- Find out What Mail-Piece Number Recovery Should Start With
Find the tray or sack file located in the folder C:\AES\EZ_out\ORDER_ID\presort\ where ORDER_ID is the address list order number appearing in the ‘Lists’ tab.
Edit the file named "group_NN.csv" where NN is the tray or sack number.
For example, if you needed to restart tray 18 for job-id 4257 after the last good mail-piece produced:
TRACY SNIPE | 1561 SALEM AVE | DAYTON OH 45406-4944
Edit the file C:\AES\EZ_out\4257\presort\group_18.csv and look for this address.
The Microsoft "notepad" program will do just fine. Search for "TRACY SNIPE" using the notepad command CTRL+F.
Notepad can be made to show line numbers with View->StatusBar. Notepad shows us the record of our last mail-piece at line 55.
Just so that we know we get this right, we look at the next address "VIRGINIA WATSON | 1643 PHILADELPHIA DR | DAYTON OH 45406-4119" on line 56.
We need to restart tray 18 with mail-piece 56.
2- Switch to "Group" Mode -- <Right-click> the "Next Tray" text changes the mode.
3- Specify the Tray Number and Starting Mail-piece
"<Click> To Set Group" opens the window allowing us to specify the start and stop tray 18 and to skip the first 55 mail-pieces starting with mail-piece 56.

"Accept" closes the window and loads the addresses as shown below starting with the expected mail-piece and shows 11,692 address.
As expected, we see " VIRGINIA WATSON | 1643 PHILADELPHIA DR | DAYTON OH 45406-4119" as the first mail-piece confirming the accuracy of the restart.

4- <Click> the "Print" Icon to Send Missing Mail-pieces to the Printer
EZ24x7 Custom Labels and Configuring Return Address and Permit Imprint
If you decide to design your own mail-piece, Mail-Piece Designer can help. When designing your own mail-piece it is strongly recommended that you have the design approved using the free mail-piece design resource at your Local USPS Business Network office.
From the “Select Label” drop-down list-box, selecting the envelope or label closest in design to the one you wish to create. Right-click on the selected envelope or label to open the Mail-piece Designer.