Preparation Presorting Your Mail
EZ24x7 Help & Instant Hint Messages
Every screen has a question mark, "?", icon that gives you a quick hint of what to do next.
The [F1] key provides context sensitive tutorial help.
Use the "Help" menu from EZ24x7’s main window for more extensive help resources.
EZ24x7 "Preparation" Tab
The tab allows for presort preparation of the serviced address list. If the list has been prepared for mailing in an earlier session, the earlier preparation is resumed automatically when entering this tab.
Hints are provided at the top of the screen. The question mark, "?", icon displays a hint message and [F1] will open this page.
EZ24x7 Mail Preparation
Mail preparation begins with selecting a mail class as shown below.
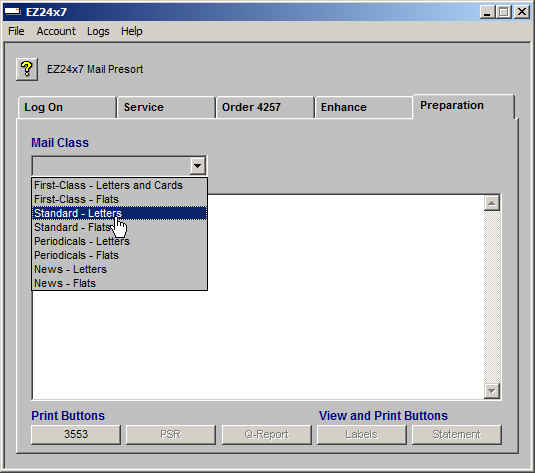
Once a mail class has been selected, sort options and mail-piece specifications appear.
Standard and Periodical Mail support Enhanced Carrier Route, ECR sort.
If the eLOT add-on service was applied to the address list, the ECR sort option checkbox appears as shown for Standard and Periodical Mail.
Only if the eLOT add-on was chosen during the service request will this option appear.
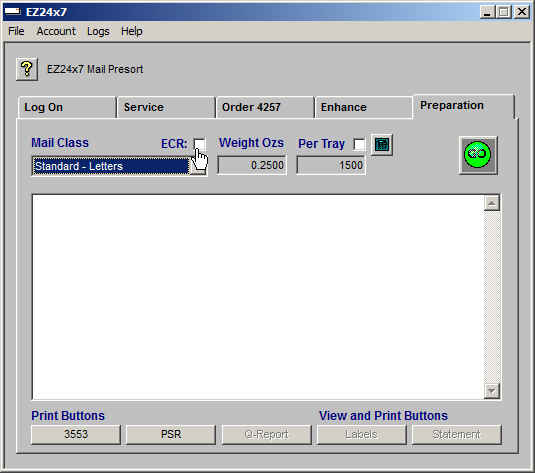
First-Class Letters has a ‘Cards’ option and Standard/Periodical Mail has an ‘ECR’ option checkbox.
The mail-piece weight field exists for all mail classes. An accurate decimal ounce value is critical for Postage Statement acceptance and has additional importance with sacked mail-pieces (flats) when generating the qualification report and sack plan.
Sack limits are controlled by the value ‘SACK_MAX=70’ in C:\AES\cfg\config.svc. The USPS maximum is 70 pounds and the AES systems minimum is 40 pounds.
All First-Class mail is trayed. Standard and Periodical Letters are trayed. Trayed mail requires the ‘Per Tray’ limit affecting mail tray planning.
The correct value is the number of letters that fit into a 2-foot tray or if First-class flats, the number of flat pieces that fit into a flat tray.
EMM trays are extra tall letter trays specified by checking the Per Tray checkbox -- important because all EMM trays are 2-foot long while regular letter trays exist in both 1-foot and 2-foot lengths.
The calculator icon opens a window that can help you accurately determine the number of letters or cards per tray.
<Click> the ‘GO’ button when mail class, sort options and mail-piece characteristics are set.
EZ24x7 "Mail-piece Filter" Popup Window
EZ24x7 allows you to choose which mail-pieces to include in the mailing based on a suitability code assigned to each address when serviced by EZ24x7.
Suitability codes are summarized as checkboxes in the "Mail-piece Filter" popup window and discussed in detail in EZ24x7 Service File.
Only codes ‘7aa’ and ‘8au’ are checked by default because these are the most reliable and should be 100% deliverable.
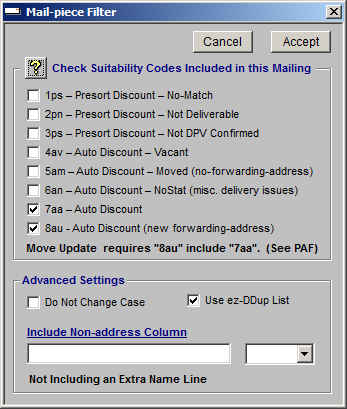
Check the suitability code groups you want included in the mailing.
Advanced setting let you select names and addresses as upper and proper case. Serviced addresses are by default upper case and names are left as they were read from the input file.
If de-duplication was run against the address list, the default is use the de-duped list. A checkbox allows you to specify the original complete service file instead. Remember that de-duplication is available from the File menu.
Some mailers will want to include a third name line (not using during NCOALink move update) which can be any field number or constant and placed above, below or in the case of two input names, between.
Close the windows with a <click> on the ‘X’ in the upper-right corner of the window or <click> the ‘Accept’ button. If you change your mind about running presort, <click> ‘Cancel’.
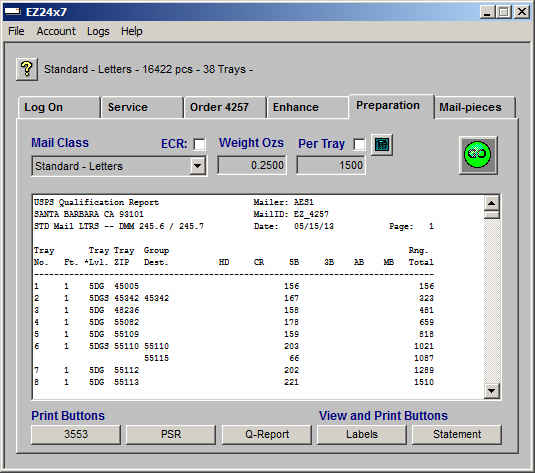
EZ24x7 "Qualification Report"
Shown below in the large scrollable data window is the qualification report for this mailing.
EZ24x7 "Print Setup"
All print buttons and icons are affected by ‘Print Setup’ available from the file menu or CTRL+P.
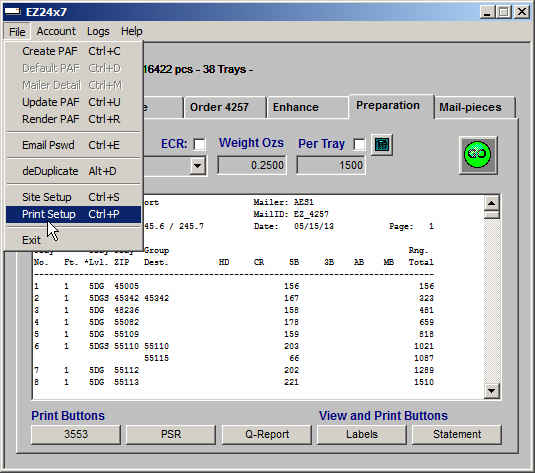
EZ24x7 "Print Buttons"
The USPS PS-3553, the NCOALink Process Summary Report, PSR, and the qualification report are printed with the first three command buttons. There is no window associated with these buttons sending reports directly to the printer established by ‘Print Setup’.
Pseudo PDF Printer:
There are several free PDF writers that create PDF documents whenever you print. After installing a PDF Printer, it can be selected and configured from Print Setup. Google "best free PDF writer".
EZ24x7 "Labels"
Tray and sack labels are shown and printed from the ‘Labels’ command button.
There are two layouts for labels controlled from Site Setup using the checkbox ‘Pin Fed Tray Labels’. When:
• Not Checked - Tray labels are produced using Laser Business Card 3.5x2.0 5371 and sack labels are produced using Pin Fed 3.5x.94 4010/3/8, 4600.
• Checked - Both Tray and Sack labels are produced using Pin Fed 3.25x2.0.
The image shows Tray Labels for this mailing when ‘Pin Fed Tray Labels’ is not checked.
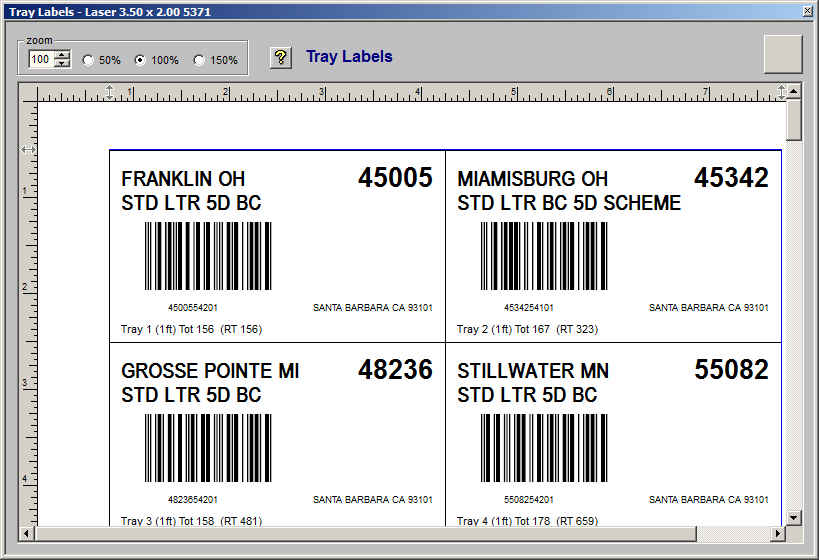
<Click> on the printer icon prints the labels. For convenience, ‘Print Setup’ is also available from this window with a <right-click> of the same printer icon.
EZ24x7 "Statement"
The postage summary is shown and printed from the ‘Statement’ command button.
The drop-down list box labeled ‘Page Selection’ lets you view the pages included in the Postage Statement. Only the pages required for the mailing are available.
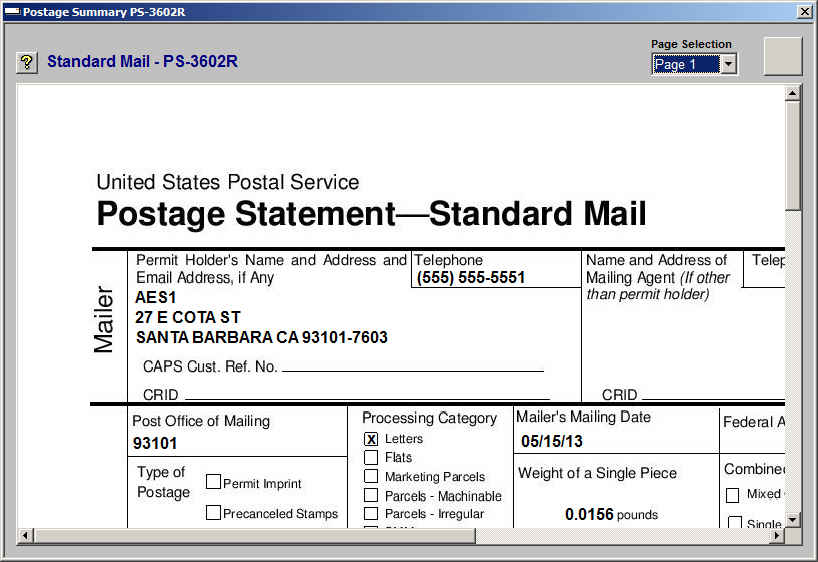
<Click> on the printer icon prints the Postage Statement. For convenience, ‘Print Setup’ is also available from this window with a <right-click> of the same printer icon.
Master Presort List
The master presort list is necessary for mail-piece generation if the EZ24x7 "Mail-piece" tab is not being used for this purpose. The master presort file contains all mail-pieces in sort sequence order. The file can be found in "C:\AES\EZ_out\OID\presort\ auto_list.csv", where OID is the order id.
The master presort list has thirteen standard columns. If the original address list fields were attached during EZ24x7 service, original fields begin in column fourteen.
- Address key if included in the file description, otherwise the original address list’s record number.
- Diagnostic field is carried over from field two of the service output file.
- The OEL, Optional Endorsement Line, field appears right justified as the first line in the address label. The field is required for Enhanced Carrier Route sortation and must appear on the first address in sacked bundles.
- First name specified in the file description
- Second name specified in the file description
- Mailing address auxiliary line (top address line on the label just below name(s))
- Mailing address delivery line (just above the last line of address label)
- Mailing address last line
- Encoded IMb, Intelligent Mail Barcode
- Mail-piece sequence number
- Tray or sack number
- Group or bundle number in the tray or sack
- Group or bundle sequence number
Do Not Echo Input – Check or Unchecked in Site Setup
If the Service File records have original address fields appended, the Master Presort List will include them starting with column 14.
Input address records are appended to Service File records by default. You can choose not to append the address list records.
If the address list is fixed-field, the entire fixed-field record will be found in column 14. If the fixed-field record contains either a comma or double-quote character, the field will have a double-quote added before and after the record. Double-quotes found in the input address record are doubled consistent with CSV format rules.
If the address list is delimited field, each field in the address list record will be appended. The first address field will be column 14 the second column 15 and so on. The echoed address list fields will be in CSV format even if the input address list was <TAB> delimited.
Zone charts depend on the entry ZIP-code. The following instructions will establish the USPS zone chart.
- Determine the 3-digit ZIP-code of the USPS facility where mail will be presented.
- Open USPS Zone Chart web page.
- Enter 3-digit zip code of entry point.
- Select the entire context using either the menu bar Edit->SelectAll or by CTRL+A.
- While all text has been selected, copy the data using either menu bar Edit->Copy or by CTRL+C.
- Run notepad START->Run and type notepad.
- Paste the text either with the menu bar Edit->Paste or by CTRL+V.
- Save the file:
o Menu bar File->Save
o Set the field labeled "File name:" to USPSZONE.zzz where zzz is the 3-digit zip code of entry facility from step 1.
o Set the field labeled "Save in:" to the Mail*STAR home directory, "C:\AES".
o <Click> the button marked "Save".
NOTE: Windows may add ".txt" to the end of this file name. If it does, you will need to remove the .txt.